Dify 是一个开源的大语言模型(LLM)应用开发平台,目前是开源的,可以拿到完整的前后端源码,Dify 虽然开源协议,但要求前端代码保留版权协议和Logo。

下面流程是如何源码安装,并修改打包前端代码。
安装docker
由于我会用到整个开发环境,docker我用宝塔部署的,部署非常简单,直接安装完宝塔后,点击 docker 菜单安装即可:

由于docker镜像在国外,我们修改成国内镜像,点击 打开配置文件,将以下内容复制进去
{
"exec-opts": ["native.cgroupdriver=cgroupfs"],
"insecure-registries": [
"192.168.9.203:5000",
"192.168.9.203:8082",
"https://wtrtlz41.mirror.aliyuncs.com"
],
"log-driver": "json-file",
"log-opts": {
"max-file": "3",
"max-size": "100m"
},
"registry-mirrors": [
"https://docker.m.daocloud.io/",
"https://huecker.io/",
"https://dockerhub.timeweb.cloud",
"https://noohub.ru/",
"https://dockerproxy.com",
"https://docker.mirrors.ustc.edu.cn",
"https://docker.nju.edu.cn",
"https://xx4bwyg2.mirror.aliyuncs.com",
"http://f1361db2.m.daocloud.io",
"https://registry.docker-cn.com",
"http://hub-mirror.c.163.com",
"https://docker.mirrors.ustc.edu.cn"
],
"runtimes": {
"nvidia": {
"args": [],
"path": "nvidia-container-runtime"
}
}
}
复制完成后重启docker。
安装python运行环境
# 安装 Miniconda
wget https://repo.anaconda.com/miniconda/Miniconda3-latest-Linux-x86_64.sh
bash Miniconda3-latest-Linux-x86_64.sh


#按照提示操作,当提示你是否“同意许可协议”时,输入 yes 并继续。然后,选择安装位置(通常直接按回车接受默认位置即可),并设置 Conda 的 PATH(建议选择 yes)。
echo 'export PATH="/root/miniconda3/bin:$PATH"' >> ~/.bashrc

#更新系统环境配置
source ~/.bashrc

# 验证安装
conda --version
conda init

# 运行环境
conda create -n dify python=3.12
conda activate dify
克隆源码
git clone https://github.com/langgenius/dify.git
cd dify
修改docker配置文件
由于我本机已经安装了pgsql 和 redis ,现在把 dify的 pgsql 和redis 默认的端口改下:
cd docker
vi docker-compose.middleware.yaml

# 第20行
ports:
      - "${EXPOSE_POSTGRES_PORT:-5433}:5432"

# 第39行
ports:
      - "${EXPOSE_REDIS_PORT:-6380}:6379"

# 执行:
docker compose -f docker-compose.middleware.yaml up -d
安装后台服务环境
cd api


#2. 备份配置文件
cp .env.example .env


#3. 生成随机密钥:
#此条命令会在.env配置文件里的SECRET_KEY配置项后面追加一串随机符
awk -v key="$(openssl rand -base64 42)" '/^SECRET_KEY=/ {sub(/=.*/, "=" key)} 1' .env > temp_env && mv temp_env .env
# 4. 修改.env配置文件相关配置:
#例如PostgreSQL\Redis\Weaviate\Celery的相关连接配置,请根据实际的情况对应修改
#安装配置poerty,一般安装pip时会有poetry,可用pip list查看,若没有再行安装,本示例使用1.8.5
pip install poetry==1.8.5
poetry env use 3.12
poetry lock --no-update


#安装依赖,注意该命令的执行目录要在包含poetry的相关文件的目录下执行方可生效
poetry source add --default mirrors https://pypi.tuna.tsinghua.edu.cn/simple
poetry source add --default mirrors https://mirrors.aliyun.com/pypi/simple/
poetry install
poetry install --no-interaction --no-ansi --timeout 1000


# 安装onnxruntime
# https://pypi.org/project/onnxruntime/#files
poetry add ./onnxruntime-1.20.1-cp312-cp312-manylinux_2_27_x86_64.manylinux_2_28_x86_64.whl
poetry shell
poetry run python -m flask db upgrade


# 启动api服务
poetry run python -m flask run --host 0.0.0.0 --port=5001 --debug


#Linux/MacOS:
pip install celery == 5.3.0
poetry install

# 启动后台进程
celery -A app.celery worker -P gevent -c 1 -Q dataset,generation,mail,ops_trace --loglevel INFO


#Windows:
pip install celery == 5.3.0
poetry install
celery -A app.celery worker -P solo --without-gossip --without-mingle -Q dataset,generation,mail,ops_trace --loglevel INFO
安装前端运行环境
cd web
cp .env.example .env

apt install npm
npm config set registry https://registry.npmmirror.com
npm install -g n

n latest
sudo npm install -g pnpm

# 服务打包
pnpm install
pnpm run build
pnpm run start
启动后,默认是 3000端口,如下:

以上代码就跑起来了,下面我们改下代码:dify默认会打开个 Start Chat 确认页面,如下图:
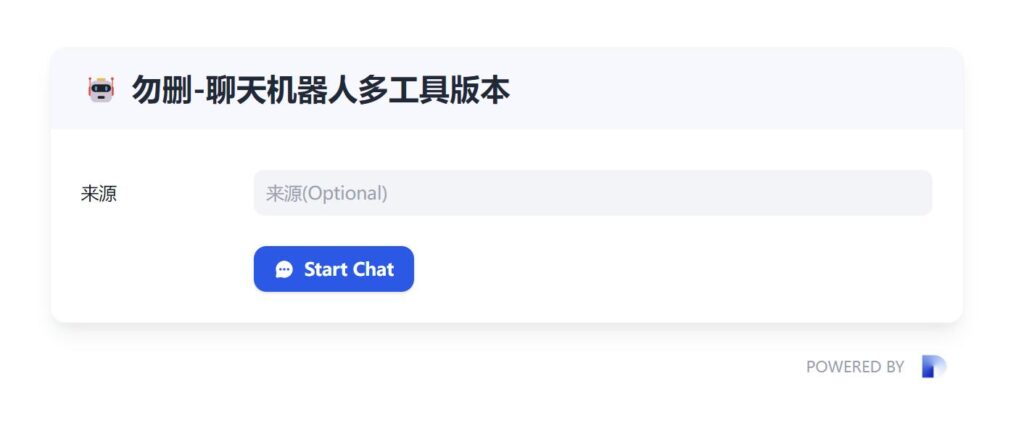
我们来写个代码去掉它:
在这里:\web\app\components\base\chat\chat-with-history\config-panel\index.tsx 加入代码
 useEffect(() => {
    // 在组件挂载后立即调用 handleStartChat
    handleStartChat();
  }, [handleStartChat]); // 依赖项数组中包含 handleStartChat,确保它变化时重新执行
重新打包 发布:
pnpm run build
pnpm run start
再打开,可以直接进入对话了!
阅读剩余 84%
转载作品,原作者:三丰,文章来源:https://www.toutiao.com/article/7482329464819466791
 微信赞赏
微信赞赏  支付宝赞赏
支付宝赞赏